Summertime brings lovely warm weather so that everyone can have a great experience when they go camping, hiking, or walking. Spending time outdoors in the summer requires good camping showers to stay clean. You may not have difficulty staying clean for short car camping trips since you can always find a close water source and wash up every time you need. However, spending a prolonged period outdoors requires a bit more effort.

On top of having a portable power station like the Acevolt Campower and installing solar panels to power your campsite, you can also build a portable camping shower to ensure you stay clean and have a comfortable time. In fact, a DIY camp shower is not all that difficult to setup, and there are several ways to go about this. They are typically available in two forms – the traditional non-DIY portable shower and the solar-heated portable shower.
Below are step-by-step instructions on how to make your DIY shower.
What you’ll need to DIY a portable shower:
- Depending on how much water – a 10 feet length of 4 inches pipe
- Two 4-inch end caps
- A 4-inch T-joint ABS fitting with a threaded opening at the top
- A half-inch brass locknut
- An aluminium wheel’s Schrader valve
- Schrader bike pump
- A 3/4 inch hose spigot
- Hose with nozzle
- Flat rubber O-ring
- Two foam blocks to hold the crossbars under your car and keep the shower more secure
- Petroleum jelly
- Sandpaper
- Waterproof silicone sealant
- Cement and primer
Tools:
- Hacksaw to cut the pipe
- Knife or scissors to cut the hose
- Hand Drill with 1/8 inch, 3/4 inch, and 3/8 drill bits to make holes of multiple sizes
- Marker to create indication for accuracy

Step-By-Step Instructions to DIY a Portable Shower
Step 1: Plan for the portable outdoor shower.
You need to determine the amount of water your shower should hold and the overall weight when it’s filled. The amount of shower time is also subject to water capacity, the psi of the pump, and the nozzle you use. A good size can be about 4.5 gallons of water from a 6-inch long hose to provide about 25 minutes of shower time.
Step 2: Cut your main pipe.
Measure a considerable length of your 10-feet pipe and mark the spot with the marker – 5 feet may be suitable depending on the size of your vehicle. Measure another 6-inch from the leftover pipe and cut both marks with the hacksaw. You now have a 5 feet length pipe and a 6-inch piece.
Step 3: Make foam blocks.
Foam blocks ensure your portable camping shower stays fitted in one position. This step is not extremely necessary, but it’s a recommendation. Place one end of the pipe on the side of a foam block, for the pipe’s bottom is close to the middle. Mark the semi-circle shape with a marker, and cut the shape out using a marker. Repeat the step on another block for balance.
Step 4: Drill the spigot’s hole.
Put the brass locknut in one of the end caps, close to the edge but not touching the outside. Mark the position and make a dot in the middle with a marker. Drill a hole through the end cap from that dot, and move to 3/4 inch. The gap should be wide enough to allow the fixture to fit smoothly.
Step 5: Fix the Schrader valve.
Mark another dot above the spigot hole close to the opposite side of the end cap. With a 3/8 inch drill bit, make a hot at that dot to allow the valve to run through from back to front. Fix it with the smooth face side sticking out and install the narrow side of the flanged washer in the front of the valve stem. Keep the washer and valve together and apply silicone around the opening, so it attaches to the valve stem.
Step 6: Fix the spigot.
Fit a flat rubber O-ring to the bottom of the fixture’s thread. Apply silicon around the rubber and insert the spigot into the drilled hole on the front face of the end cap. Also, apply silicone to the inside look of the end cap and screw the fastener to create an airtight seal.
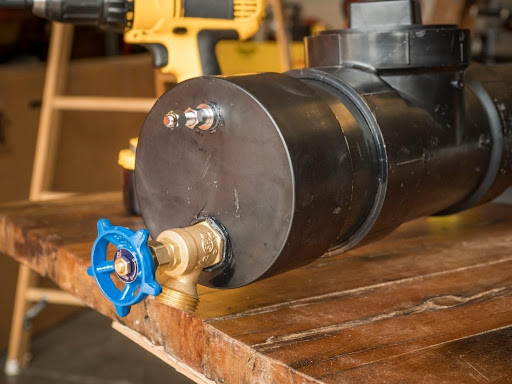
Step 7: Assemble the camp shower.
Roughen up the edge of the pipe with sandpaper. Then, clean and prime the pipes before you glue. Ensure you clean the outside end of your T-joint and the end caps. From one piece to another, apply cement to the inside of the end cap while pressing the connections firmly. Assemble the pieces such that the plain end cap, 5-feet pipe, T-joint pipes, and end cap with spigot connect in this order. Ensure the end cap valve and the opening on the T-joint aligns at the top of the shower while the fixture points down.
Step 8: Install the camp shower on your car.
If you are using foam block, slide both into your crossbars. Put the shower on the blocks or directly on the bars with the fixture positioned at the vehicle’s rear. Use straps to ensure the shower is firmly on the crossbars.
Step 9: Fill with water.
Once the camp shower is on your car, unscrew the cap on the T-joint opening, and fill it with water using a hose or a jug. While doing this, leave space for pressurized air. Apply petroleum jelly to the threads of the cap to ensure it has a tight seal, and screw it back.

Step 10: Pressurize the camp shower
Screw the hose with the nozzle on the fixture you fixed. Take out the Schrader valve cap and attach your air compressor or bike pump. Allow the pump to reach the desired pressure, then fix the valve back on. Going over your pipe’s pressure might damage your portable camping shower. Re-pressurize your shower based on the usage time.
Step 11: Sample your camp shower
This is where you test out your work. Open up the spigot and test your new portable camp shower. The sun can help warm your portable shower for camping and clean off muddy pups, dirty feet, sticky hands, or sweaty skin.
Conclusion
With this portable outdoor shower you created yourself, you don’t have to worry about keeping yourself clean after a long day of car camping. Even though you should not drink or cook from this DIY portable shower, it can help keep you fresh during your trip.
The amazing part is you can go along with your Acevolt Campower 2000 portable power station to provide electricity to your campsite and enhance your camping experience. With these upgrades to the usual camper campsite hacks, nothing can prevent you from having a great experience.
You may be interested in: Understanding the Types and Applications of Drilling Machines