For professionals in the business of bathroom installations and finishes, understanding the intricacies of wet room kits is not just about aesthetics—it’s about precision, reliability, and the satisfaction of a job well done. Wet rooms have become a popular choice for modern homes, blending functionality with sleek design to create spaces that are both accessible and stylish. As an installer, your ability to choose and implement the right wet room kit is crucial in ensuring a waterproof, efficient, and visually appealing outcome.

This guide is tailored specifically for installers and bathroom finishing professionals looking to deepen their understanding of wet room kits. It aims to provide you with comprehensive knowledge about the components, varieties, and installation nuances of wet room kits, enabling you to offer informed advice to your clients and ensure a seamless installation process.
We’ll begin by defining what a wet room kit encompasses and the typical components you’ll encounter, such as the shower tray, drainage system, and waterproofing materials. Recognizing the importance of quality and compatibility in these components is key to a successful installation. Additionally, we’ll explore the diverse range of wet room kits available, discussing how to match the right size, style, and features with the specific needs of each project.
Whether you’re dealing with compact urban bathrooms or more spacious layouts, this guide will equip you with the knowledge to confidently select and install the perfect wet room kit. Let’s dive in and enhance your expertise, ensuring every wet room you create stands as a testament to quality and professionalism.
Understanding Wet Room Kits
Definition and Components
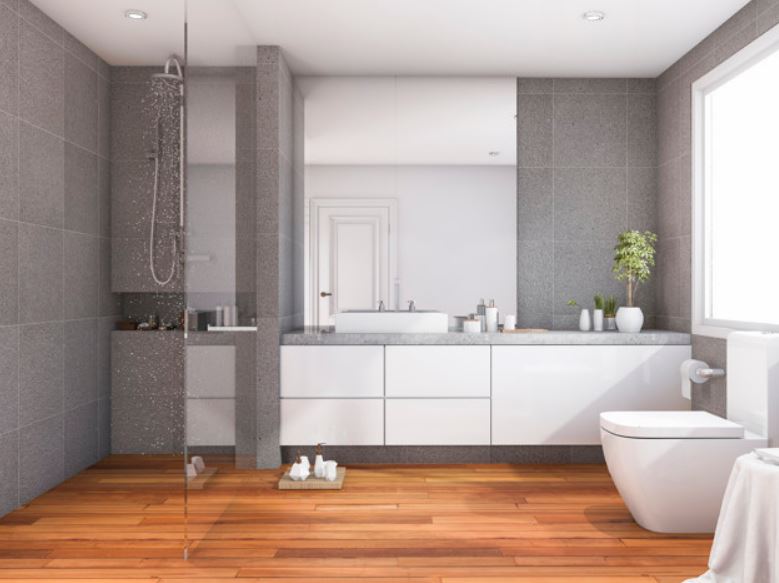
A wet room kit forms the backbone of a waterproof, level-access shower area, a crucial aspect of modern bathroom design. For installers and bathroom professionals, understanding these kits is key to ensuring a successful and durable installation. A typical wet room kit comprises:
- Shower Tray (Former): This is the base of the wet room, designed to support the floor tiles and manage water flow to the drain. Usually, it includes a pre-formed gradient to facilitate proper drainage.
- Drainage System: An efficient drainage system is vital for any wet room. It usually consists of a waste trap and a drain (linear or square), strategically placed to optimize water flow from the shower area.
- Waterproofing Membrane: This component is essential to prevent water leakage. The membrane is applied beneath the floor surface to create a watertight barrier, protecting the structure of the building.
- Additional Elements: Depending on the kit, other elements may include sealants, adhesives, and tile backer boards, all designed to enhance the waterproofing and structural integrity of the wet room.
Varieties
Wet room kits come in various forms to cater to different installation needs, aesthetic preferences, and bathroom sizes:
- Sizes and Shapes: They range from small, compact trays for tighter spaces to larger ones for more expansive bathrooms. The shape of the tray can also vary, including square, rectangular, and custom designs to fit unique spaces.
- Designs and Aesthetic Options: Wet room kits are designed to blend seamlessly with a variety of bathroom styles, from ultra-modern to more traditional. The choice of drain covers and finishes can significantly impact the overall aesthetic.
- Drain Styles and Positions: The position and style of the drain (linear vs. square, center vs. offset) are crucial considerations. Each style offers different benefits in terms of aesthetics and installation logistics.
- Customization and Adaptability: Many kits offer customization options or adaptable features like trimmable trays, catering to bathrooms with irregular dimensions or specific design requirements.
For installers, knowing the range of options available in wet room kits is essential for advising clients and ensuring that each installation is tailored to meet specific needs and preferences. This understanding not only helps in creating functional and stylish wet rooms but also in building a reputation for quality and expertise in bathroom installations.
Step-by-Step Selection Process
Assessing Needs
The first step for any installer is to thoroughly assess the specific needs and constraints of the bathroom space. Consider the following:
- Space and Layout: Measure the area accurately. Consider the shape and any structural obstacles that might affect the installation.
- Client Preferences: Understand the client’s style preferences, usage patterns, and any special requirements they might have.
- Functionality Requirements: Consider the needs related to the drainage system, waterproofing, and any additional features like underfloor heating or bespoke design elements.
Researching Options
Once you have a clear understanding of the requirements, the next step is to explore the different wet room kits available:
- Explore Varieties: Look at different sizes, shapes, and designs of wet room kits. Pay attention to the details of each component and how they might fit into the specific project.
- Compare Suppliers: Evaluate different suppliers for their quality, price range, and the options they offer. Read reviews and check their reputation in the market.
- Check Availability: For timely completion of your projects, check the availability and delivery times of the kits. Online stores often provide a wide range of options with convenient delivery, making them a reliable source for purchasing wet room kits.
Consulting Professionals
Even experienced installers can benefit from consulting with peers or specialists:
- Seek Expert Advice: If you encounter a unique challenge or need a second opinion, don’t hesitate to consult with fellow plumbers, bathroom designers, or technical support from the wet room kit supplier.
- Stay Informed: The industry is always evolving with new technologies and methods. Stay up-to-date with the latest trends and best practices by engaging with professional communities and forums.
- Vendor Support: Reputable suppliers, often found through online retail platforms, can provide additional insights and recommendations based on their extensive experience with various products and customer feedback.
While exploring options, remember that online stores can be an excellent resource for finding a wide selection of wet room kits. They often offer detailed product descriptions, customer reviews, and the convenience of direct delivery to your site, making the selection process smoother and more efficient. With a thoughtful approach and the right resources, you can ensure that each wet room installation meets the highest standards of quality and client satisfaction.
Installation Considerations
DIY vs. Professional Installation
When it comes to installing a wet room kit, particularly for a concrete floor, the decision between DIY and professional installation is critical.
DIY Installation: This can be a cost-effective option for those with adequate experience and confidence in their skills. The pros include personal satisfaction and potentially lower upfront costs. However, the cons are significant. Mistakes can be costly, and without the right tools and expertise, the risk of improper installation and future water damage is high. For a complex project like a wet room, even small errors can lead to big problems.
Professional Installation: Hiring a professional ensures expertise and experience are brought to your project. Professionals understand the nuances of waterproofing, drainage, and local building codes. The downside might be higher initial costs, but this is often offset by the assurance of quality and the avoidance of costly mistakes.
Common Pitfalls to Avoid
When installing a wet room shower tray on a concrete floor, several common pitfalls need to be avoided:
- Inadequate Preparation: Ensure the concrete is properly prepared, clean, and level. Any debris or dust can affect the adhesion and level of the tray.
- Incorrect Tray Positioning: The tray needs to be flush with the surrounding floor. Incorrect positioning can lead to improper water flow and pooling.
- Poor Drainage Planning: Ensure the waste trap and pipework are correctly positioned and securely fitted. The drain should be accessible for maintenance and aligned properly with the tray’s outlet.
- Ignoring Waterproofing: Waterproofing is crucial. Inadequate sealing can lead to leaks and water damage. Ensure all joins, edges, and the surrounding area are fully sealed and that the waterproofing membrane is correctly applied.
- Rushing the Process: Take your time to ensure each step is completed correctly. Rushing can lead to mistakes that might not be immediately apparent but can cause significant issues later on.
Specifics for Concrete Floors
When installing a wet room kit on a concrete floor, the process typically involves:
- Cutting and Preparing the Concrete: This might involve grinding or cutting into the concrete to accommodate the tray and ensure its level with the surrounding area.
- Planning for the Drain: Depending on the tray model, you may need to adjust the depth of the cut to accommodate the drain. Ensure the drain is accessible and that there’s enough space for the waste trap and pipework.
- Ensuring Proper Slope: The tray should have a pre-formed slope for drainage. Verify this slope once the tray is in place to ensure efficient water flow.
- Securing the Tray: Use a suitable adhesive to secure the tray to the concrete. Ensure it’s level and fully supported with no movement.
- Waterproofing: Apply a waterproofing membrane over the tray and surrounding area, paying special attention to joints and edges.
Note that for timber floors, the process and considerations might differ, particularly in terms of floor preparation, support structure, and waterproofing methods.
Remember, while this guide provides an overview, always refer to the specific installation instructions provided with your wet room kit and consider consulting a professional to ensure a successful and durable installation.
Maintenance and Upkeep
Maintaining a wet room is crucial for ensuring its longevity, functionality, and hygiene. Regular care and prompt attention to any issues that arise are key to keeping the space looking pristine and operating efficiently. The surfaces, especially the floor and drainage system, should be cleaned regularly to prevent the buildup of soap scum, lime scale, and mold, which are common in wet and warm environments. Use non-abrasive cleaners to protect the waterproofing sealants and tile finishes. Pay special attention to the drainage area; it should be kept clear of debris and hair to prevent clogging and ensure a swift water flow.
Periodic checks of the sealant and grout lines are also essential. Over time, these can deteriorate or crack, potentially leading to leaks or water damage. Any signs of wear should be addressed promptly by resealing or regrouting the affected area. Additionally, ensure the drainage system is functioning correctly. A slow-draining wet room can be a sign of blockages or issues with the installation that need to be addressed.
Troubleshooting common issues promptly can prevent them from escalating into more significant problems. If you notice persistent dampness, a musty smell, or visible water damage outside the wet room area, it’s important to investigate the cause immediately. These symptoms could indicate a leak, inadequate ventilation, or other issues that might require professional attention. In cases where the water isn’t draining properly, checking and cleaning the drain trap and waste pipe for blockages can often resolve the issue.
Conclusion
In this comprehensive guide, we’ve navigated through the various aspects of choosing, installing, and maintaining the right wet room kit, specifically tailored for installers and bathroom professionals. Starting with an understanding of what a wet room kit is and its essential components, we explored the diverse range of options available, emphasizing the importance of selecting a kit that matches the specific needs of each project. We delved into the step-by-step selection process, highlighting the importance of assessing needs, researching options, and consulting professionals.
Installation considerations were discussed with a focus on the pros and cons of DIY versus professional installation, especially for concrete floors, and we pinpointed common pitfalls to avoid during the installation process. Moreover, the vital role of regular maintenance and troubleshooting tips was outlined to ensure the longevity and hygiene of the wet room.
As you make your choice and proceed with your wet room projects, remember the importance of thorough planning and precision. Each decision, from the selection of the kit to the installation and maintenance, contributes to the overall success and durability of the wet room. Always consider the specific needs of the space and the users, and stay informed about the latest products and techniques. Your expertise and attention to detail will not only ensure the technical success of the installation but also result in a space that provides comfort, functionality, and style for years to come.
In conclusion, the journey to creating the perfect wet room is intricate and requires a keen understanding of the products and processes involved. By taking the time to carefully assess each step and staying abreast of industry best practices, you can ensure that your installations are not just successful but exemplary. Your commitment to quality and functionality will be reflected in every wet room you create, ensuring satisfaction for both you and your clients.
Regular maintenance not only ensures the wet room remains a clean and pleasant space but also protects your investment by preventing costly repairs and prolonging the life of the installation. Encourage users to adopt good habits, such as wiping down surfaces after use and ensuring adequate ventilation, to maintain the room’s hygiene and appearance. By staying vigilant and addressing issues as they arise, you can ensure the wet room remains a functional, stylish, and hygienic addition to the home for years to come.
Interesting Related Article: “Most promising shower crisis arrangements“